If you’re unsure what Load Balancing is, you can find out more details about Load Balancing here.
For more details, check out ADVANCED Load Balancing (Transaction Routing).
Text Instructions for How to use Load Balancing
Step 1: Login to the correct gateway account as ‘ADMIN’ User.
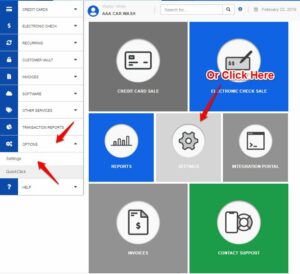
Step 2: From the ‘Main Menu’, click on ‘Settings’ under ‘Options’.
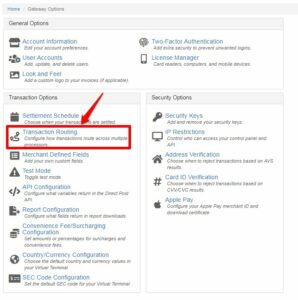
Step 3: Click on ‘Load Balance’ under ‘Transaction Routing’.
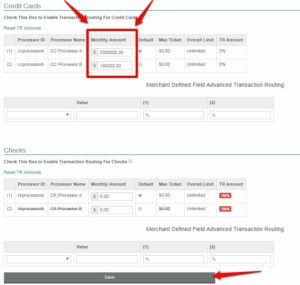
Step 4: Adjust load balance by max monthly volume.
To make any changes from the original Load Balance setup when the gateway was created, simply enter the new monthly volume amount into the ‘Monthly Amount’ field corresponding with the correct processor and then click ‘Save’.
** Note: more than one change to processor can be made at one time. Adjust as many fields as is relevant and then click ‘Save’.
In the scenario below, the merchant accounts are load balanced according to the exact maximum monthly volume limits on each merchant account.
Step 5: Adjust Load Balance by percentage.
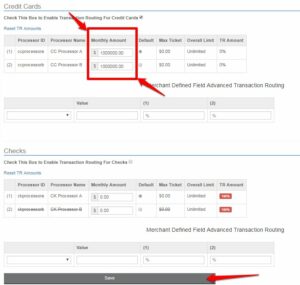
You can also adjust the load balance by percentage using the ‘Monthly Amount’ field. Simply take the TOTAL volume across all the merchant accounts and adjust the fields corresponding to the correct processor by percentage of total volume across all accounts.
Let’s pretend the merchant above had $2,000,000 total volume across both accounts and the merchant wants the Base merchant account to get 50% of the volume and the other account to also take 50% of that volume.
- Total Monthly Volume across all accounts is $2,000,000
- Divide $2,000,000 by 50%. This makes the total $1,000,000.
- The amount gets distributed equally amongst the remaining merchant account.


